Fun DIY Galentines

Hey loves!

As I am sure your feeds and favorite stores have been bombarding you with Valentine everything, here I am with more hearts and flowers. I get it. Hear me out-mamas need love too!!! Aunties need love!!! Your girl who will gather you quickly but also bail you out of jail definitely deserves love. So, for a few years now I choose Valentine’s Day to show it. 

There are two parts to my galentines- a handwritten note and a practical gift. 

By practical I mean anything from wine, to coffee, to accessories. This year hit different though. Not to harp on 2020 but if nothing, it made me really value those in my life that needs showing up. Also, almost all of these would have to go in the mail so it couldn’t be heavy, crazy expensive or require batteries. Enter Pinterest. 

Pinterest is the unsung hero of my holiday celebrations. I mean, it knows me so well, it will suggest things that aren’t even in my peripheral. So, in November when this Galentine idea landed in my lap, I took it and upped the ante a little. 

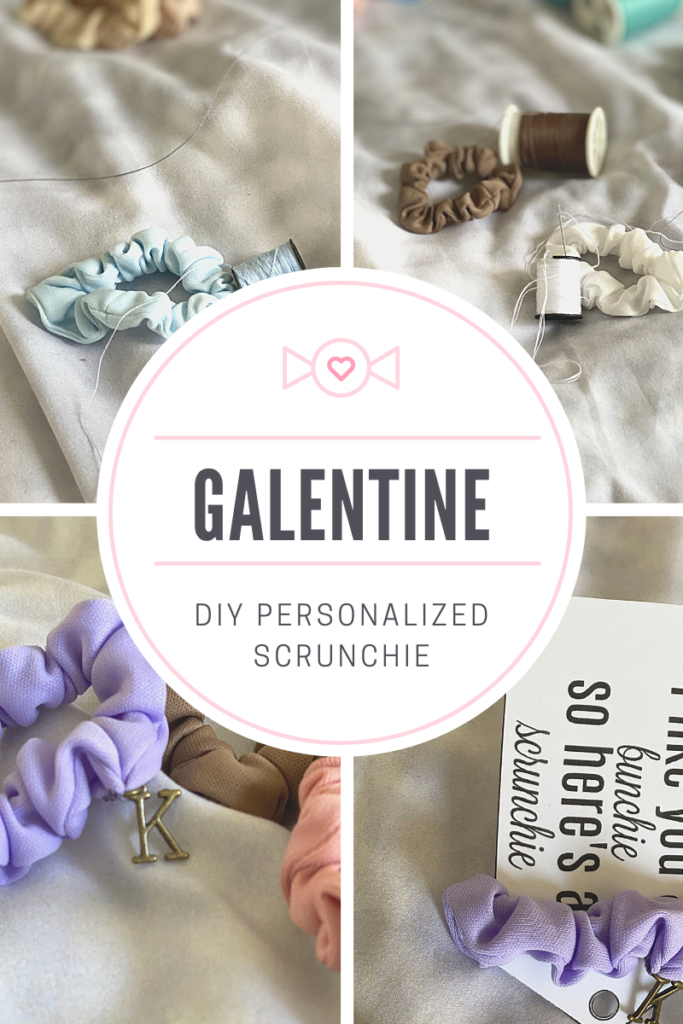
If you know me, you know two things about me: 1. I believe you shouldn’t leave home without a monogram and 2. I am always in need of a scrunchie or hair tie. 

I feel like these are things my girls could benefit from so I gathered my supplies. 

I used:

This printable (I printed on white card stock)

Initial charms

-Scrunchies

-Needle and coordinating thread

-Note cards, pens and a bleeding heart

Method:

Using a needle thread with coordinated thread close to that of the scrunchie, attach the initial charm with a few stitches, securing well with several knots.

Then, wrap the scheunchie around the printed and cut tag. Next, write out your feels for your girl. Layer in envelopes or present gifts bags. Viola! Galentine for your gal pals. 

Yes, I made one for me too. 

Love you. Mean it.

Dipes and Wipes Pouch

Hey Loves!
 

Got a super quick craft for ya! So, you know when I told you about out our toddler bag situation? Well, it occurred to me that sometimes we won’t even need that, just maybe the diapers or wipes. So, I made a cute clutch they can go in and be easily removed if necessary.


This seriously took maybe 20 minutes and very easy to do. I followed this tutorial to the T using some cute alphabet fabric that was given to me. That’s it. It was super easy and came out super cute!

Christmas Jammie’s are my Jam!

Hey loves!

The holidays are here and now that we have a baby I’m not the only kid at Christmas in our house and have good reason to be extra festive! ??
I’ve been wanting to make pajamas to put in our Christmas Eve Box (more on that later). So, I got some white t-shirts (my son and I already them, and I bought one for my husband for less than $4 at Walmart.) and then, using the Silhouette, I put a pocket monogram on each. 
Now to the pants, I waited until the week of Thanksgiving for Joanns sale to really be great. I got 5.75 yards of snuggle flannel fabric for less than $10 and also got some 3/4″ elastic for around $2 with coupon applied. 
Here is the best part: I found this awesome, super-easy to follow tutorial made all the pairs of pants in about 1.5 hours with cutting the fabric. I also added embellishments to mine, using ric rac on the hem and making a ric rac bow on the top. 
Ummm, we will probably never buy pajamas again. 
Merry Christmas!


Baby Making: Glider Edition

Hey Loves!

So with just 12 very short weeks before my baby boy is set to arrive, I’ve been busy making our home ready to welcome him. I started with recovering a glider rocking chair and ottoman that was gifted to us.

Note: I’m picky…more so than I thought. I couldn’t find a chair I really liked that went with my vision for the nursery so, as always, making one, or making as much as I could of one, was the way to go.

I started by visiting my local craft store and picking up a roll of foam padding and fabric. Our nursery theme is travel and I couldn’t resist the colors and simplicity of this fabric. It helped that my husband loved it too.

IMG_2934.JPG

The I traced the old cushions on the foam with a sharpie and cut along the lines.

IMG_2935.JPG

After that, I covered the foam pieces with the fabric, wrong side out. I didn’t cut along the fold. Instead I used it to my advantage- that’s one side without pinning or sewing. However, depending on the size of your cushions, that may not be feasible.

IMG_2936.JPG

Lastly, I pinned around the cushions, sewed them, flipped the fabric inside out and… Viola! A gorgeous custom chair for less than $35 and 1 hour of work. (I didn’t sew the bottom/back of each piece. I wanted to be able to remove for washing. I also plan to make a pillow or two for added support.)

IMG_2938.JPG

I did the same with the ottoman but that took longer because of the screws and staples from a staple gun. I used hot glue to leave room error. It won’t rip the fabric…

Until next time, like, comment and share!

Sew Cute Summer Tutorial

Hey Loves!

Summer is here! It is hot and the humidity is in full-bloom! With the season change, I cleaned out my closet and realized I was short on summer dresses, so I decided to finally use some fabric I got sometime in 2012 and make one.

You know me…(and if you don’t)

I hit Pintrest to see what was out there and I found this tutorial!

It was great! Very easy to follow and looks super chic.

I would offer these suggestions:

1. Cut the tank longer thank you think. I ruined a tank top and had to start over (using a tube top).

2. Use fabric you don’t have to line…I didn’t realize how see-through my fabric was until I was done.

3. You have good reason to fear elastic thread. I couldn’t figure it out and let’s not attempt to count how many times I tried. I looked up quite a few tutorials and tips and no luck for me.

Anywho…happy summer and happy sewing!

Like, Comment and Share!

20140523-155825-57505890.jpg

20140523-155824-57504969.jpg